
In order to optimize cycad seed germination it is important
to understand cycad seed development and the physics involved
with seeds. Once you understand the basics, you can fine-tune
your planting procedures to work best with your particular growing
conditions. I will discuss seed development, seed storage, and
various planting techniques. I will also relay what techniques
have worked best for me in my growing conditions here in Florida.
When a female cone becomes receptive, the ovules in the cone will
secrete a sticky drop of liquid. As the day progresses the liquid
dries up and is pulled into the ovule. If pollen has been in contact
with the drop, the pollen is pulled in as well. The pollen, which
are actually motile sperm cells will be stored in pollen chambers
until it is time to fertilize the ovule. This can take as long
as four months to occur. At the time of release, the sperm cells
swim down a tube and fertilize the ovule. The embryo grows at
this point and will take several more months to become full size.
The embryo at first can be seen in the middle of the seed and
will grow until it emerges from the same point that the pollen
entered months before. A seed with an immature embryo will have
a small embryo in the center with a hollow tube running from the
embryo to the point of exit. An umbilical cord type structure
called a suspensor connects the embryo and the exit point. As
the embryo grows the suspensor is compressed. Many times when
the seed sprouts the compressed suspensor can be seen exiting
the seed.
|
|
|
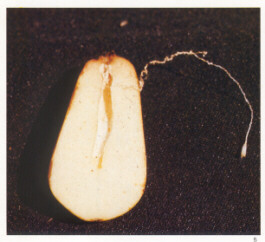
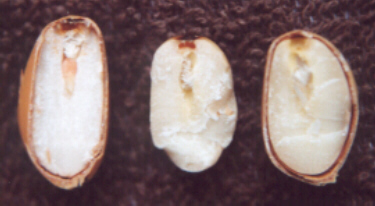
| Encephalartos seed with very immature embryo showing suspensor and embryo at end. Planting time could be as long as 4 to 6 months. | Ceratozamia seeds- left is half mature showing embryo and compacted suspensor. Plant time about a month to 6 weeks. The two on right is one seed that is very immature. The suspensor can be seen on the left side, the right only shows the other half with nothing important to be seen. Plant time about 3 months. |
|
|
|
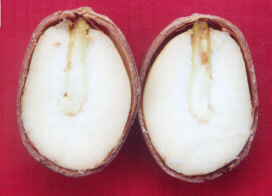
| Dioon edule seed that is ready to sprout with full sized embryo. | Zamia variegata seed with full sized embryo and on the top of the left side, you can see the compressed suspensor. |
At the time that the cone falls off the plant the embryo may or may not be full size. Cycads will hold the cones from six months up to 18 months depending on the genus and even the species within a genus. As a general rule, most embryos will become mature approximately 12 months after the initial pollination occurs, however there are also several exceptions to the rule. Southern Macrozamias can sprout as early as 9 months after pollination, and some Dioons and Zamias will take as long as 18 months before they even fall from the plant. One of the secrets to cycad seed germination is knowing how long a seed needs to be held after it falls from the mother plant. The chart below shows approximate times that seeds should be held before planting. There are some species that have very erratic embryo development. I have found that certain Encephalartos and Cycas species will start sprouting at a certain time and other seeds from the same seed batch will continue to sprout over a year or even two years time.
| Genus | Typical holding period in months |
| Bowenia | 1 to 3 |
| Ceratozamia | 3 to 6 |
| Cycas | 4 to 12 |
| Dioon | 0 to 2 |
| Encephalartos | Usually 6 |
| Lepidozamia | 3 |
| Macrozamia | 3 |
| Microcycas | 1 to 2 |
| Stangeria | 1 to 3 |
| Zamia | 0 to 2 |
Many times if a seed is planted before it is ready to sprout
it may absorb too much moisture, expand and appear as if it is
going to sprout, and then die. Depending on the growing conditions
used, this extra period gives time for fungus, and insects to
attack the seed as well. Whether you produced the seed yourself,
or if you purchased the seed from someone else, it is a very good
idea to cut one of the seeds open lengthwise down the middle to
observe the development of the embryo. In most cases, you will
save more plants by destroying one seed, compared to how many
seed will die from being planted too early.
Proper storage of seeds is the next important aspect of getting
a high germination rate. This is the point where most good seeds
can become bad seeds. Cycad seeds need a certain amount of moisture
at this time to continue developing properly. If a seed does not
get this moisture in some way the soft inside can separate from
the hard outside shell. Most of us by now have heard about rattlers
and floaters. When the inside of the seed starts to dry up, it
gets smaller which forms an air pocket and this is why a seed
will float in water or rattle when shaken. If a seed has just
started to rattle it is still possible to save the seed by soaking
it in water for a day or two. If the seed has been kept for a
long period of time without any hydration it can be too late to
save it. I never throw away rattlers or floaters and have had
hundreds of them germinate over the years. I usually plant them
separately, because if they are bad, the bad seeds will spread
fungus very fast once they are planted in a community tray or
pot.
Cycad seeds can be stored in many ways. Some should be cleaned
before they are stored and some are better off stored with the
seed coat on. The smaller the seed the better the chance of the
seed drying out on the inside. I store all my Zamia and Cycas
seeds with the fruit on. Without any special care, I have stored
Zamia floridana seed for up to seven months with the fruit on.
I have found that the same seeds will start going bad after three
months of storage if they are cleaned first. The fruity seed coat
is an amazing thing. It keeps the seed just moist enough to keep
the seed fresh, but it also inhibits the seed from germinating
until it is removed. I always store my seeds in a cool place.
I never store them in a closed container or plastic bag because
this seems to give fungus a good chance to attack the seeds. I
keep my seeds in open containers, or when I have very large amounts
of a certain seeds, I use nylon mesh bags. I soak the seeds I
have cleaned every two weeks for a couple of hours, and then let
them dry again. This keeps them moist enough so they don't go
bad, but on the other hand, they don't get to wet. The nylon bags
work great for this process.
Once you are ready to germinate your seeds you should remove the
seed coat first if it hasn't been done already. After they are
clean, I will soak them for two days in water. This really seems
to help them get started. Cycad seeds are very capable of absorbing
moisture, and there is absolutely no need to scarify or crack
the seeds. A seed that has a full sized embryo will readily germinate
once there is enough moisture, and the temperature in the growing
area is high enough. Once I soak the seeds, I will usually dip
them in a fungicide before I plant them. I prefer to use Daconil,
but there are other fungicides that will work just as well.
There are many techniques that people use to germinate their seeds.
The most important things to remember are that you want your medium
to be as sterile as possible, you want your seeds to be moist
but not wet, and you want your growing area to be warm enough
to stimulate germination.
The "bag" method is very popular, especially for people
who need to germinate their seeds indoors, or when the temperatures
are too cold outside to stimulate germination. Seeds are placed
in a plastic bag filled with a sterile medium like perlite or
vermiculite. The medium should be slightly moist but not wet.
The bag is then placed near a heat source. The temperature should
not exceed 100F just to make sure the seeds don't get damaged.
The seeds should be checked every few days to make sure that they
don't get fungus, and to remove any seeds that have sprouted.
I usually place my seeds on top of builder's sand, and then lightly
cover them with perlite. I will lightly water the area a couple
of times a week. I know of people in South Africa who plant the
seeds on top of sand and cover them with a moist burlap bag. Another
method is to plant them with the sand and perlite, but cover the
growing area with plastic so that the moisture does not escape.
This keeps you from having to water as often and will avoid the
possibility of keep the growing area too wet.
In the past I have not had a great deal of luck germinating Encephalartos
seeds with my method using the sand and the perlite. I found that
I was keeping the seeds too moist and had too many seeds rotting
before they sprouted. This is very important when certain seeds
may take up to an extra year to germinate. My newest method is
to place the seeds half way into the moist sand. There are two
ends of a cycad seed. There is the end where the seed will sprout
from and the end where the seed was attached to the cone. This
end will usually have some sort of scar on it. The pattern of
scars will vary depending on the genus and even the species in
some cases. The sprouting end will usually have only one spot
on the end, a raised area, or as with Encephalartos seeds, a series
of cracks that act as a hatch when the seed sprouts. I have found
that placing the attachment end down into the medium keeps the
seed moist enough to make sure they don't go bad. This also means
that the sprouting end is out of the medium and makes it very
hard for fungus to enter the seed like it would if it was placed
in the medium. I have doubled my germination rate on Encephalartos
seeds using this method as opposed to using my previous method
using the sand and the perlite. Once the seed sprouts, I will
then push the sprouted end in the sand and let the radicle push
down into the medium. All methods can work well, but results will
vary depending on moisture content, sterility of the growing area,
and the temperature. I personally don't use any additional heat
source, and rely on the natural temperature outside.
Dioon edule seeds planted with sprouting end up and some
already pushed down. Note the newly sprouted seeds with lighter
radicles that have not been pushed down 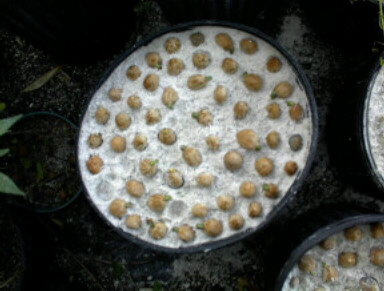 |
Author's note: I would like to thank Cynthia Giddy who years ago gave me permission to use her pictures in any article that would promote cycad conservation. It was her book on South African cycads that motivated me to start breeding cycads in the first place.
